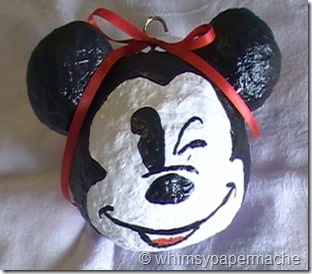
How to Make a Paper Mache Mickey Ornament
 This little Mickey ornament is a great project for anyone wanting to learn the basic steps of Paper Mache.
You can hang your Mickey on your Christmas tree or decorate any room in your home, it’s simply perfect.
Quick List
Recycled Newspaper
Masking Tape
Paints and Paint Brushes
Glue Gun (optional)
Paper Clay (optional)
H20 and Rags
Great for Beginners
You will need estimated three days to complete your Mickey, drying your Mickey armature between stages will account for most of this.
Join me now as we walk step by step through the process of selecting you mold, covering, sanding, and painting your brand new whimsical Paper Mache Mickey.
Art Preparation for Your Armature
To begin you will prepare your paste and ready your strips.
Special Paste Recipe
1 Part Flour: 2 Part Water
Dash of salt (prevent molding)
You will mix the ingredients together, I usually use my hand for mixing because it is easy to smooch the chunks of flour and get this mixed into a nice soup.
Here is a link to our favorite paper mache paste recipe: http://www.youtube.com/watch?v=ghkblf-6ijI.
Build Your Mickey Armature
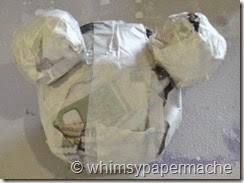
 Wade up 1large ball for Mickey's head and 2 smaller balls for ears, of recycled newspaper. Use masking tape to keep the round shape. Hot glue or tape your small balls into place on the large ball, Mickey's head.
With all the prep out of the way, it is time to start dipping some strips into the paste and draping them across your Mickey armature
Paper Mache Your Armature
If you are like me, you will find that putting the strips on is pretty fun.
Ripe up your newspaper into wide and narrow pieces for stripping. Start by getting your hands wet in the mache paste, rub your mache covered hands onto the ball and cover with a strip of wide paper.
Smooth this out with wet hands until the air bubbles are gone and continue in like matter until the Mickey armature is cover with 3 layers of paper. Your last layer can be the narrow strips. Set this aside and let it completely dry.
Once your armature is dry check to be sure there are no weak spots. If there are weak spots cover those areas with 2 or 3 more layers of paper mache strips and paste, and let it completely dry.
I choose to cover my Mickey with a 1/4 inch layer of paper clay for durability. Let the clay completely dry before painting.
Painting Your Mickey Ornament
You can paint a white base coat on your Mickey to create a white canvas. Paint your Mickey a solid color or add faces, it is your little world.
Awesome
You now have a good foundation of the beginning steps to creating paper mache art. I hope this video as sparked some creativity in you and you find that you have to make paper rmache art. Thank you for stopping by the studio have a great weekend.
Smiles and Rose
© whimsypapermache.com
Stay connected with the studio:
Face Book Page: http://www.facebook.com/WhimsyArtist
Follow On Twitter: http://twitter.com/whimsymachegirl
You Tube: http://youtube.com/user/whimsymachegirl